


Process:
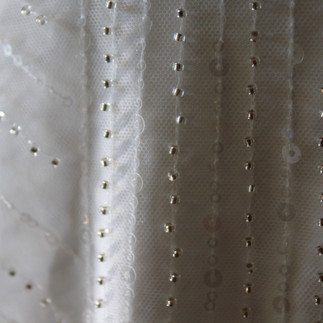
Fabric: I went to JoAnn's to go fabric shopping for inspiration and found fabric on clearance https://www.joann.com/bridal-ivory-linear-deco-beaded-sequins-on-mesh/18511683.html. I bought 5 yards of fabric (I would have bought more to have extra on hand in case I mess up, but this was all they had and it was not re-orderable because it was discontinued). The overlay fabric is a mesh with linear patterns of beads and clear sequins. Most of the lines run vertically, so I decided that this fabric would fit well with a dress that is fairly flowy and does not puff out much for the skirt. If I chose too full of a circle skirt with vertical lines, it would be hard to keep them all going in the proper direction, especially at the seams. Therefore, I chose a sewing pattern to use as a starting point, and then will manipulate it to get a better fit and add style details.
Style: My ideal dress includes a sweetheart neckline, a low back, a flowy skirt, and a short train. I want a simple silhouette with a fancy fabric. To have a low back, the lack of fabric and therefore stability in the back makes it necessary to either have straps so that it can stay put in the bust or to sew boning into the seams for support. I do not like using boning, so I chose to have thin straps.
Practice: I practiced by choosing cheap clearance fabric with similar texture and level of difficulty sewing. For the first mock-up, I used "Desert Sage" Scalloped Sequins on Mesh over sanded satin. The first mock-up was promising because it was easy to make (completed in two days) and had the basic shape I wanted. The issues that it brought up were that I was unsure how to get the train to flow right, the chest felt too droopy because I did not sew pads or a bra directly into the dress, and I ran out of fabric and did not have enough for straps because I had bought the end-of-bolt on clearance and could not buy any extra. This mock-up made me realize I wanted to try again to figure out the train and bust fit before working on the real dress.
More practice: For mock-up #2, I used "Silver" Scalloped Sequins on Mesh over "Surf the Web" double sanded charmeuse. I used bias tape for straps, sewed a bra into the chest for stability and smoother lines, lowered the center front of the neckline to create a better sweetheart neckline shape, and made a more-defined train. I also narrowed the shape of the low v-back because it allowed me to better secure the straps and added more support to the top.
The final dress!
First, I carefully steamed my fabric because the charmeuse is very light and wrinkles easily.
Next, I lay out the fabric, placed the pattern pieces according to grainline, pinned the pieces down, and cut the fabric. For this dress, I am using one layer or beaded/sequined mesh overlay, two layers of charmeuse, and then a third layer of charmeuse as a lining. I am using 4 total layers rather than the 3 total I used for previous iterations due to the sheerness of the white fabric. I want to make sure the dress is thick enough that it is not see-through, but not so thick that the seams are too bulky.
Then, I carefully hand-stitched the zipper, the hook and eye clasps, and the straps to the back. This took approximately an hour.
The fabric was difficult to machine sew, and I ended up breaking 7 sewing machine needles on the hard beads. I used the edge of the presser foot as the SA guide.
I sewed the dress extra long so that I could cut it down to size once I decided on the heel height of shoes I would wear.
So far, the steaming took approximately a half hour, the laying out and pinning pattern pieces to the fabric took about a half hour, cutting took a half hour, and sewing took three hours.
Comments